- MongoDB 下载链接:
- centos7 镜像下载链接:
- 也可以在服务器上面:wget
1.创建基础目录(已经有的话 , 请跳过)
# 用来存储我们下载好的一些文件或者软件mkdir -p /home/service# 用来存储配置文件mkdir -p /home/config# 用来存储日志mkdir -p /home/logs# sh脚本mkdir -p /home/sh安装wget:yum install wget2. 下载解压mongo(复制全部 , 粘贴运行就好了)
# 没有wget 的话 , yum install wgetcd /home/servicewget tar -xzvf mongodb-linux-x86_64-rhel70-4.4.0.tgz -C /home/service/mv /home/service/mongodb-linux-x86_64-rhel70-4.4.0 /home/service/mongodb3. 编写mongo配置(复制全部 , 粘贴运行就好了)
mkdir -p /home/service/mongodb/myconfigln -s /home/service/mongodb/myconfig /home/config/mongodbcat <<'EOF'> /home/service/mongodb/myconfig/mongodb.confdbpath = /home/service/mongodb/data/dblogpath = /home/service/mongodb/data/logs/mongodb.logport = 27017# 测试下可以0.0.0.0,正式环境:127.0.0.1bind_ip=0.0.0.0fork = true#nohttpinterface = trueauth=trueEOF# 软链ln -s /home/service/mongodb/data/logs /home/logs/mongodb4. 设置mongo自启文件(复制全部 , 粘贴运行就好了)
mkdir -p /home/service/mongodb/data/dbmkdir -p /home/service/mongodb/data/logscat <<'EOF'> /home/service/mongodb/myconfig/mongodb.service[Unit]Description=mongodbAfter=network.target remote-fs.target nss-lookup.target[Service]Type=forkingExecStart=/home/service/mongodb/bin/mongod --config /home/service/mongodb/myconfig/mongodb.confExecReload=/bin/kill -s HUP $MAINPIDExecStop=/home/service/mongodb/bin/mongod --shutdown --config /home/service/mongodb/myconfig/mongodb.confPrivateTmp=true[Install]WantedBy=multi-user.targetEOFcp /home/service/mongodb/myconfig/mongodb.service /lib/systemd/system/mongodb.servicesystemctl enable mongodb.servicesystemctl start mongodb.serviceservice mongodb status5. 配置系统环境(复制全部 , 粘贴运行就好了)
cat <<'EOF'>> /etc/profileexport MONGODB_HOME=/home/service/mongodbexport PATH=$PATH:$MONGODB_HOME/binEOFsource /etc/profile6.创建MongoDB管理员
【centos7 安装 MongoDB (复制粘贴系列)】mongouse admin#创建mongo管理员 , 并且赋予权限db.createUser({ user: 'admin', pwd: 'mongoAdmin', roles: [ { role: "userAdminAnyDatabase", db: "admin" } ] });#退出登录exit7. 防火墙开启27017端口(复制全部 , 粘贴运行就好了)
yum -y install firewalldsystemctl start firewalld.servicechkconfig --level 35 firewalld onfirewall-cmd --zone=public --add-port=27017/tcp --permanentfirewall-cmd --reloadfirewall-cmd --list-ports8. 测试访问
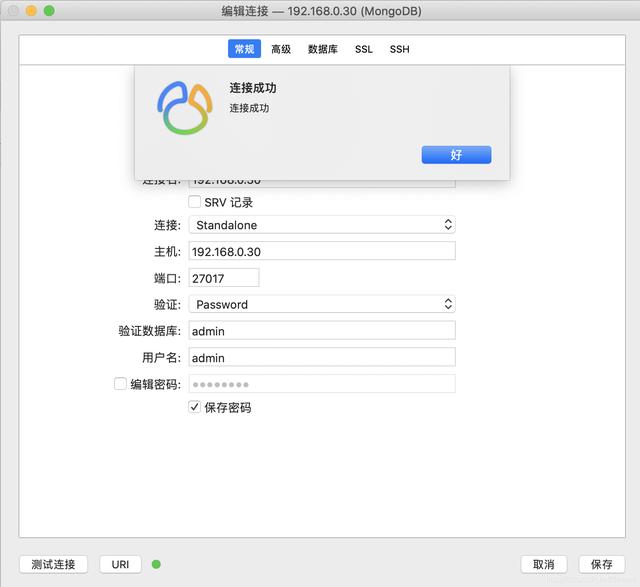
文章插图
推荐阅读
-
「肖战」刘喜龙导演:肖战拍摄的三部电视剧已经纳入到播出计划当中
-
-
月球■人类进化中被淘汰的器官开始复活,科学家研究后:不是好消息!
-
伊周潮流|美妆胶卷 |“夏日清爽肌肤疗法”,帮你做一个清爽的夏日美人!
-
战国|千古奇人为何被严重低估?千古奇书为何沦为禁书?书曰:鬼谷子
-
-
-
才女说车|东风轻型车全新一代轻卡全球首发!“一剑双星”都是啥车?
-
-
c盘autodesk是什么意思?Autodesk是什么意思-
-
-
三国两晋南北朝|如果曹丕重用了曹彰,没有收走曹彰的兵权,魏国还会灭亡吗?
-
-
-
火眼看玉石|其实都不值钱,别再被骗了,这4种听起来很洋气的宝石
-
-
-
-
『诗涵妈咪』“吃饭不许看动画”,成功引起全家攻击,《安家》里海清的一句话
-
卡哇伊|这3生肖8月最后15天,财发不断,短时间就能挣大钱,12生肖中